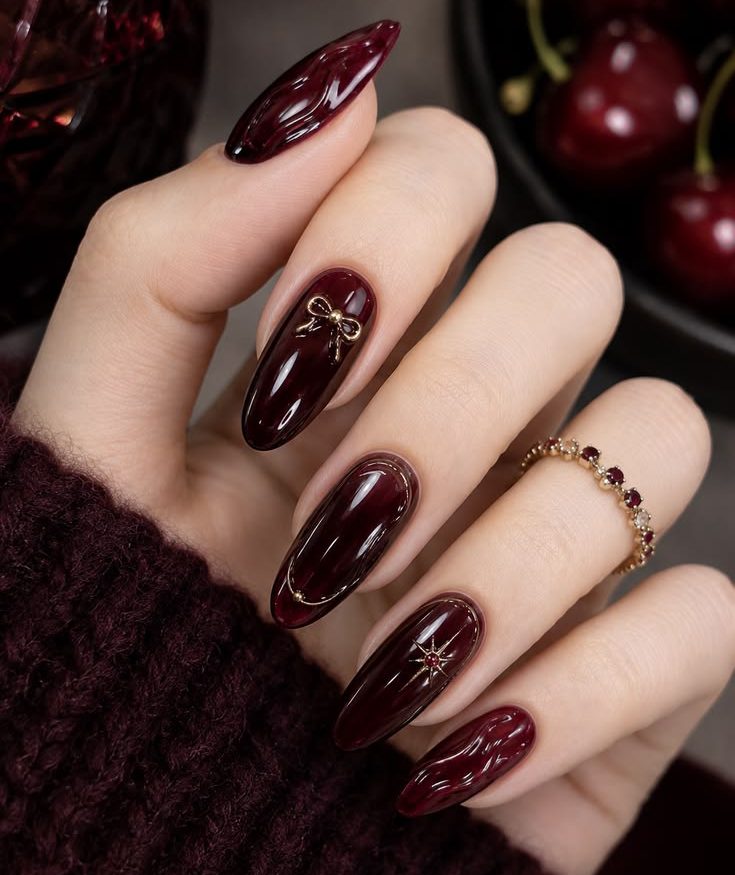
Whether you are preparing for a festive holiday party, a romantic dinner, or simply looking to elevate your daily style with a touch of glamour, dark cherry red nails with gold details offer a high-end aesthetic that suits any occasion. In this comprehensive guide, we will explore why this trend is dominating nail design, how to create this exact look step-by-step, and how to keep your manicure looking fresh for weeks.
1. Why Dark Cherry Red & Gold Nails Are Trending
Dark cherry red (often referred to as deep burgundy, wine, or black cherry) has long been associated with luxury and sophistication. Adding fine gold accents elevates the traditional monochromatic red nail into a detailed work of art.
Key Elements of This Design
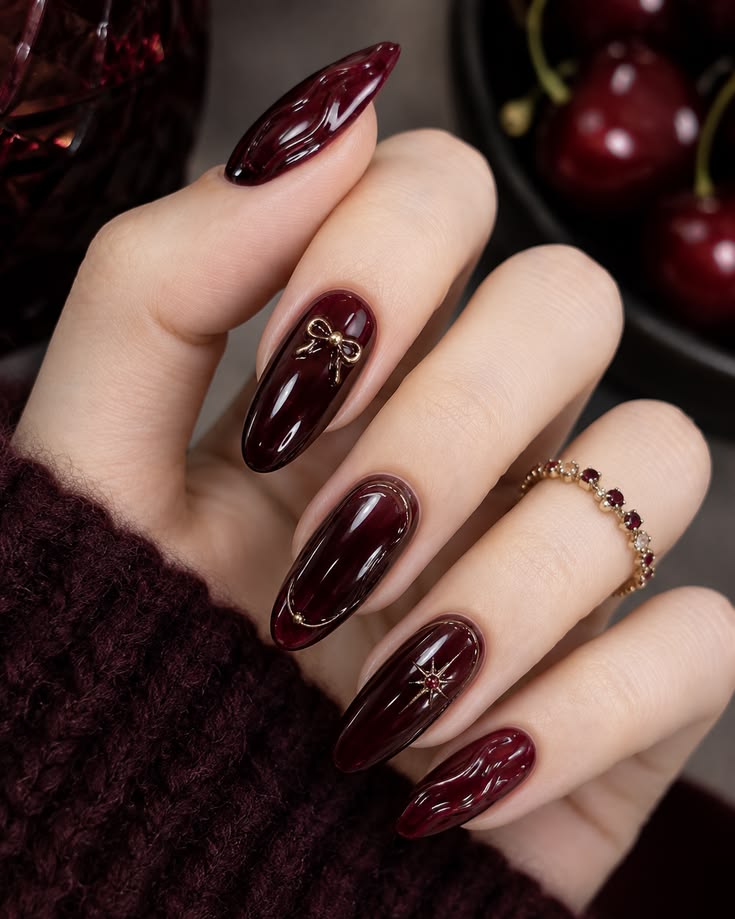
- Deep Burgundy Base Color: Rich, full-coverage dark red polish that provides high shine and contrast against fair or deep skin tones.
- Almond Nail Shape: A classic almond or oval shape elongates the fingers and gives an elegant contour.
- Gold 3D Bow Accent: A delicate metallic bow adds a chic, coquette-inspired touch without overpowering the nail.
- Minimalist Gold Borders & Starbursts: Ultra-fine gold lines and sparkling starburst motifs provide a celestial, jewelry-like finish.
- Glossy Swirl/Marble Effect: Subtle textured line work adds depth and visual intrigue under direct light.
2. Essential Tools & Materials Needed
To recreate this salon-quality dark cherry manicured look at home, you will need the following tools and supplies:
| Product Category | Recommended Items |
| Nail Prep & Base | Dehydrator, Primer, Strength-boosting Gel Base Coat |
| Color Polish | Deep Cherry / Dark Burgundy Gel Polish |
| Accent Materials | Gold 3D Bow Charm, Fine Metallic Gold Liner Gel / Chrome Powder |
| Nail Art Tools | Ultra-thin Detail Liner Brush, Rhinestone Glue / Gel, UV/LED Lamp |
| Finish & Care | High-Gloss No-Wipe Top Coat, Cuticle Oil |
3. Step-by-Step DIY Tutorial
Follow these clear, professional steps to achieve a flawless dark cherry red manicure with gold accents:
Step 1: Prep the Nails
- Shape & File: File your natural nails or nail tips into a smooth almond shape. Lightly buff the surface of each nail to remove shine and texture.
- Cleanse: Clean the nails using isopropyl alcohol or acetone to remove any dust and natural oils.
- Base Layer: Apply a thin layer of gel base coat and cure under a UV/LED lamp for 60 seconds.
Step 2: Apply the Dark Cherry Base Color
- First Coat: Apply a thin coat of deep cherry red gel polish across all nails. Cure for 60 seconds.
- Second Coat: Apply a second layer to build full, opaque coverage and rich color depth. Cure for another 60 seconds.
Step 3: Add the Detailed Gold Accents
- Index Finger (Gold Bow): Apply a tiny drop of gel charm resin or rhinestone glue near the cuticle area. Place the small 3D gold ribbon bow and cure in place for 60 seconds.
- Middle Finger (Gold Outline): Using a fine detail brush and gold liner gel, paint a subtle, ultra-thin gold curve near the bottom or frame of the nail bed. Cure for 30 seconds.
- Ring Finger (Starburst Accent): Paint a delicate starburst pattern using gold liner gel or place a gold star charm centered on the nail. Add a tiny red rhinestone or micro-bead in the center for added dimension.
- Pinky Finger (Glossy Marble Swirls): Use a slightly lighter red or sheer gloss to paint smooth, subtle swirl lines to mimic a dark marble texture. Cure thoroughly.
Step 4: Seal and Protect
- Top Coat Application: Apply a thick layer of high-gloss, no-wipe gel top coat over all nails, paying extra attention around the 3D charms to ensure they are securely locked in place.
- Final Cure: Cure under the UV/LED lamp for a full 90 to 120 seconds.
- Moisturize: Finish by massaging nourishing cuticle oil around each nail bed to keep the skin hydrated and glowing.
4. Care and Maintenance Tips
To keep your dark cherry manicure chip-free and ultra-shiny for 2 to 3 weeks, follow these essential maintenance guidelines:
- Wear Protective Gloves: Always wear rubber gloves when washing dishes or using household cleaning chemicals to protect the gel finish and preserve charm adhesion.
- Apply Cuticle Oil Daily: Keep your cuticles moisturized to prevent peeling, lifting, and dry skin framing your manicured nails.
- Avoid Using Nails as Tools: Refrain from opening cans or peeling stickers with your nail tips to prevent chipping the delicate gold line work or loosening 3D charms.
- Reapply Top Coat: If using traditional nail polish instead of gel, apply a fresh coat of clear top coat every 3 days to protect the polish and maintain a high-gloss finish.
5. Frequently Asked Questions (FAQs)
What nail shape works best with dark cherry red polish?
While dark cherry polish looks stunning on almost all shapes, almond and oval shapes are particularly popular because they accentuate the sleek, elegant aesthetic of deep red hues and fine gold accents.
How do I ensure 3D gold charms don’t fall off?
Use dedicated rhinestone gel or builder gel to attach charms rather than regular top coat. Ensure the gel seals all around the base of the bow or charm before curing completely under a UV/LED light.
Can I achieve this look with regular nail polish?
Yes! You can use a dark burgundy regular nail polish as the base. Allow it to dry completely before placing nail charms with nail glue or painting fine lines with gold metallic nail art pens, then seal with a high-shine clear top coat.
Conclusion
Dark cherry red nails paired with detailed gold accents strike the ultimate balance between glamour, sophistication, and creative design. From the delicate 3D bow to the subtle starburst details, this manicure style is perfect for anyone wanting to make a statement with their nails. Try out this aesthetic for your next salon visit or DIY nail session to achieve a chic, high-shine look!