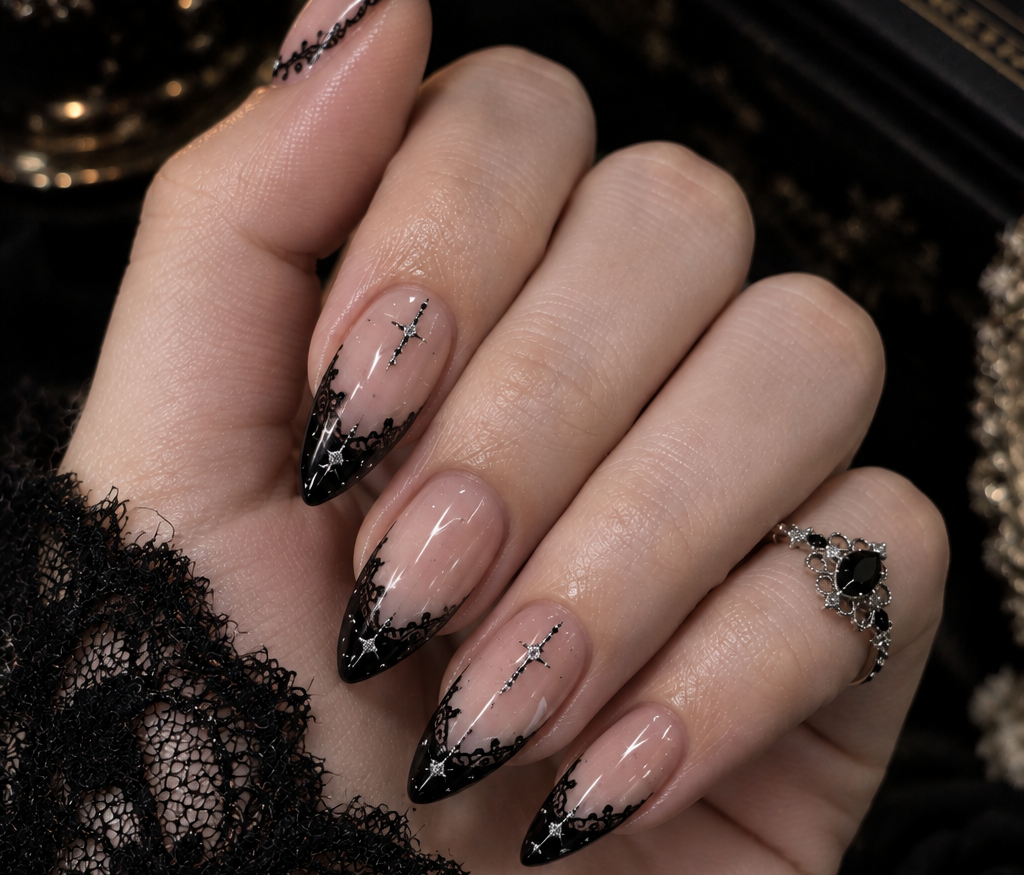
By taking the classic, clean silhouette of traditional French manicure tips and recreating them with intricate black lace detailing, delicate cross accents, and sparkling starburst motifs, this design offers an edgy, high-fashion twist. Whether you are looking for spooky-season Halloween nail inspiration or an all-year dark academia look, this comprehensive guide covers everything you need to know about creating, maintaining, and styling these stunning celestial gothic nails.
Why Black Lace & Celestial Nail Art is Trending
Modern manicure trends have shifted heavily toward intricate line art, textured accents, and dark romance aesthetics.
- Dark Romance & Gothic Elegance: Traditional gothic style relies heavily on lace, rich black tones, and vintage metallic details. Translating these elements onto a natural or nude nail base gives a sophisticated, subtle look that remains edgy.
- Versatility of the Almond Shape: Long almond or stiletto nail shapes elongate the fingers and provide an ideal canvas for detailed nail art, allowing intricate lace trims and vertical celestial symbols to shine without overcrowding.
- Contrast & Nuance: Using a glossy nude or translucent beige base allows the high-contrast jet-black lace tips and delicate silver/white starburst sparkles to pop with high visibility.
Elements Breakdown: Anatomy of the Look

To reproduce or request this design at your next salon appointment, it helps to understand its key design components:
| Element | Description |
| Nail Shape & Base | Long, tapered almond/stiletto shape with a smooth, nude-tinted glossy gel base. |
| Lace French Tip | Intricate black filigree or lace trim along the smile line, tapering smoothly down the sides. |
| Celestial Accents | Delicate white and silver starbursts and fine-line gothic crosses drawn centered on the nail plate. |
| Aesthetic Theme | Dark Academia, Gothic Luxe, Celestial Magic, Spooky Chic. |
Step-by-Step DIY Tutorial: How to Recreate This Look at Home
If you love performing your own gel manicures or press-on designs at home, follow this step-by-step tutorial to achieve salon-quality results.
Materials You Will Need:
- Nail prep tools (cuticle pusher, fine-grit file, buffer, dehydrator/primer)
- Almond shape full-cover gel tips or builder gel extensions
- Translucent nude or soft pink gel polish
- Highly pigmented black gel paint (or fine-liner gel polish)
- Ultra-fine nail art liner brushes (5mm & 7mm)
- Silver/white gel liner or fine glitter paint
- Micro-rhinestones or silver star sequins (optional)
- Shiny, non-wipe gel top coat
- UV/LED curing lamp
Step 1: Prep and Base Application
- Prep the Natural Nails: File, shape, push back cuticles, and gently buff the shine off your natural nail bed. Cleanse thoroughly with alcohol or dehydrator.
- Apply Extensions or Tips: Secure full-cover almond tips using nail glue or gel extension builder gel. Ensure the edges are smoothly blended into the cuticle area.
- Apply the Nude Base: Apply 1–2 thin coats of a sheer, nude-pink gel polish to create a healthy, natural canvas. Cure under your UV/LED lamp for 60 seconds after each layer.
Step 2: Drawing the Black Lace French Tips
- Outline the Smile Line: Using a fine liner brush dipped in black gel paint, sketch the curve of the French tip following the natural free edge of the nail.
- Add Filigree Scallops: Below the main curve, paint small interlocking arcs and loop patterns to simulate lace trimming.
- Detailing the Netting: Add tiny dots along the inner curve and thin criss-cross lines to give the illusion of sheer lace fabric.
- Cure: Once satisfied with the lace pattern on all fingers, cure for 60 seconds.
Step 3: Celestial Crosses & Sparkle Details
- Paint Central Symbols: Using your ultra-fine liner brush and white/silver gel paint, draw a thin vertical axis down the center of select nails (such as the index and ring finger). Add a shorter horizontal bar to create a delicate gothic cross.
- Add Starburst Flashes: Accent the cross centers and lace borders with four-point star sparkles (a vertical flare crossed with a horizontal flare) and tiny accent dots.
- Cure: Lock the line art in place with a 60-second UV/LED cure.
Step 4: Top Coat & Finishing Touches
- Apply High-Gloss Top Coat: Coat the entire nail in a thick layer of non-wipe glossy gel top coat to smooth out any line art texture and protect the design. Cure for 60–90 seconds.
- Nourish: Finish by applying cuticle oil around the nail beds to restore hydration and enhance overall hand aesthetic.
Styling & Pairing Ideas
This dramatic dark manicure serves as a bold fashion statement. Here is how to style your overall look around it:
- Jewelry & Rings: Pair with oxidized silver, vintage filigree rings, or dark gem accent rings (such as onyx or obsidian) to amplify the gothic vibe.
- Wardrobe: Black lace sleeves, sheer black mesh fabrics, velvet coats, and dark academia tailoring (blazers, pleated skirts, corset tops) pair effortlessly with this nail aesthetic.
- Makeup: Match the moody undertones of the nails with dark lip shades (plum, berry, or soft black), smoked-out eyeliner, or a clean minimalist face with bold brows.
Nail Care & Longevity Tips
To keep long almond gel nails looking fresh for up to three or four weeks without chipping or lifting:
- Use Gloves: Always wear protective gloves when doing household chores or washing dishes to prevent chemical exposure from weakening the gel bond.
- Daily Cuticle Oil: Hydrate daily with vitamin E or jojoba oil to maintain flexibility in the natural nail bed beneath the extensions.
- Avoid Using Nails as Tools: Avoid opening cans or prying objects with the tips of your nails to prevent stress fractures in the gel structure.
Final Thoughts
Gothic lace and celestial-inspired nail art offer the perfect balance of refined beauty and dark artistic flair. Whether you bring this picture to your nail tech as reference art or attempt the intricate line work yourself at home, this standout manicure design guarantees head-turning elegance.