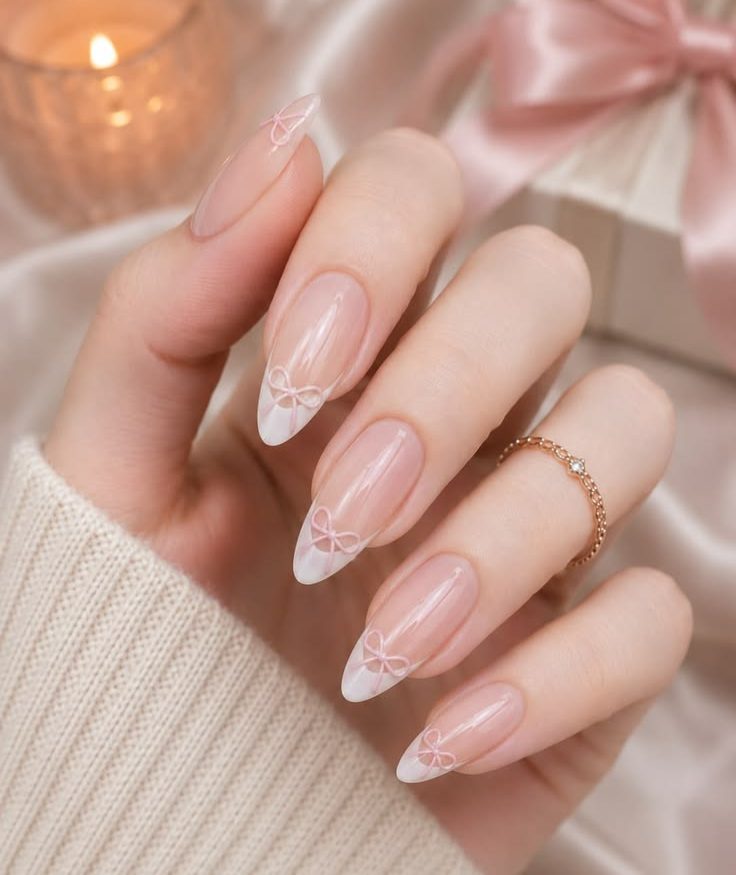
Whether you are looking for aesthetic inspiration for your next nail appointment, seeking a comprehensive DIY tutorial to create 3D ribbon details at home, or searching for expert nail care tips to keep your manicures lasting longer, this ultimate guide covers everything you need to know about this iconic nail design.
Table of Contents
- Introduction to the Coquette Bow Nail Trend
- Key Design Elements of the Featured Manicure
- The Almond Nail Shape
- Nude Base & Classic Soft White French Tip
- Delicate 3D Pink Ribbon Bow Accents*
- Why Pink Bow French Tip Almond Nails Are Trending
- Tools & Products Required for a Professional Look
- Step-by-Step Tutorial: How to Recreate This Look at Home
- Phase 1: Nail Preparation & Shaping
- Phase 2: Base Coat & Perfecting the French Smile Line
- Phase 3: Crafting the 3D Pink Ribbon Bows
- Phase 4: Sealing, Top Coat, and Finishing Touches
- Variations & Customization Ideas
- Nail Maintenance: Keeping Your 3D Nail Art Flawless
- frequently Asked Questions (FAQs)
- Conclusion
1. Introduction to the Coquette Bow Nail Trend
In recent seasons, fashion and beauty have witnessed a massive resurgence of delicate, nostalgic, and hyper-feminine aesthetics—most notably popularized under the term “Coquette Aesthetic.” Defined by soft pastel tones, lace, pearls, satin ribbons, and subtle romanticism, the coquette trend has seamlessly transitioned from wardrobe styling directly into nail artistry.
At the intersection of modern minimalist nail art and hyper-detailed embellishment sits the Pink Bow French Tip Almond Manicure. It reimagines the iconic 1990s French tip by introducing raised, sculptural pink ribbon accents centered right on the French smile line. The result is a look that feels elevated yet whimsical, traditional yet unmistakably contemporary.
This specific nail style has gained immense popularity for bridal events, baby showers, spring and summer holidays, Valentine’s Day, or simply as an everyday chic aesthetic for anyone who loves soft, polished elegance.
2. Key Design Elements of the Featured Manicure

To understand why this specific manicure design works so harmoniously, let us break down its core visual components:
A. The Almond Nail Shape
The almond shape is widely recognized by professional nail technicians as one of the most universally flattering nail shapes. Characterized by slim, tapered sides that gently round off at a soft peak, almond nails elongate the appearance of the fingers, giving the hand a slender, graceful look. The natural curve of an almond nail provides the ideal canvas for a curved French manicure line and holds centered embellishments like 3D bows naturally.
B. The Glossy Nude Base & Soft White French Tip
Rather than using harsh stark white polish, this design employs a soft, milky white or creamy off-white for the French tip. Coupled with a sheer, glossy nude-pink base polish that closely matches the natural nail bed, this color combination ensures seamless regrowth and a clean, fresh finish.
C. Delicate 3D Pink Ribbon Bow Accents
The true showstopper of this manicure is the delicate pink bow applied to every single nail. Placed precise in the middle where the nude nail bed meets the white French tip, these bows are created using raised 3D gel or acrylic lines. The subtle pink outline gives the illusion of a tied ribbon resting atop the nail, adding texture, depth, and tactile beauty to the hands.
3. Why Pink Bow French Tip Almond Nails Are Trending
Nail art trends rarely become viral sensation by accident. Several factors contribute to why this specific manicure remains at the top of beauty search trends across Pinterest, Instagram, and TikTok:
- The Rise of “Soft Girl” and “Coquette” Fashion: Fashion lovers are embracing soft pastels, bows, and delicate details. Nails serve as a key accessory to complete these thematic outfits.
- Versatility Across Occasions: While detailed, the color palette remains neutral (nude, white, soft pink). This makes the design appropriate for formal corporate settings, casual weekend wear, and high-profile events alike.
- Universally Flattering: Almond nails elongate shorter finger lengths, and nude-pink base polishes complement virtually every skin tone when undertones are matched correctly.
- Tactile & Photogenic Appeal: 3D nail art creates dimension that catches light beautifully, making hands look instantly camera-ready for jewelry showcases, engagement announcements, or lifestyle photos.
4. Tools & Products Required for a Professional Look
Whether you plan to perform this manicure yourself at home or want to bring precise instructions to your nail technician, having the correct professional tools and high-quality products is essential for achieving a salon-grade outcome.
Essential Hardware & Supplies:
- Nail File (180/240 Grit): For shaping the natural nail or acrylic extensions into a precise almond outline.
- Buffer Block: To smooth out the nail plate and eliminate ridges before base coat application.
- Cuticle Pusher & Nippers: To clear the cuticle area for a seamless, long-lasting manicure.
- UV/LED Nail Lamp: Required for curing gel polishes and 3D gel formulations.
- Fine Liner Nail Art Brushes (Detail Brushes): Ultra-thin brushes (5mm to 9mm length) essential for creating smooth French tip curves and fine bow loops.
Essential Polishes & Gels:
- Nail Dehydrator & Primer: Preps the natural nail plate to eliminate oils and maximize adhesion.
- Rubber Base Coat or Strengthening Base Gel: Creates a resilient, smooth foundation.
- Sheer Nude-Pink Gel Polish: A natural-looking cover nude that enhances the nail bed color.
- Milky White or Soft Cream Gel Polish: For drawing the French tip smile lines.
- Pastel Pink 3D Painting Gel or Sculpting Gel: High-viscosity gel polish that stays raised without spreading or running before UV curing.
- Non-Wipe Glossy Top Coat: Protects the manicure against chips, scratches, and yellowing while giving a mirror-like shine.
- Nail & Cuticle Oil: Hydrates skin post-manicure for a healthy, nourished finish.
5. Step-by-Step Tutorial: How to Recreate This Look at Home
Creating a 3D pink bow French manicure requires patience, steady hands, and attention to detail. Follow this structured step-by-step tutorial to achieve flawless results.
+-------------------------------------------------------------------+
|                     MANICURE WORKFLOW OVERVIEW                    |
+-------------------------------------------------------------------+
|  1. Prep & Shape  -->  2. Base & Nude Color  -->  3. French Tips  |
|                                                                   |
|  4. 3D Bow Details -->  5. Seal with Top Coat -->  6. Cuticle Oil |
+-------------------------------------------------------------------+
Phase 1: Nail Preparation & Shaping
Proper preparation is 80% of a manicure’s longevity. Never skip these foundation steps:
- Cleanse Hands: Wash hands thoroughly and sanitize all nail tools.
- Cuticle Care: Gently push back cuticles using a wooden stick or metal pusher. Remove dead skin buildup near the eponychium with cuticle nippers if necessary.
- Shape the Almond Nails:
- File the sides of each nail at a slight diagonal angle towards the center point.
- Round off the tip gently so it forms an almond shape, ensuring there are no sharp points or asymmetrical angles.
- De-shine & Dehydrate: Lightly buff the surface of the natural nail with a fine buffer to remove shine. Wipe away dust using a lint-free wipe saturated with isopropyl alcohol or nail cleanser. Apply nail dehydrator and primer.
Phase 2: Base Coat & Perfecting the French Smile Line
- Apply Base Coat: Apply a thin layer of gel base coat over the entire nail plate, capping the free edge. Cure under your UV/LED lamp for 60 seconds.
- Apply Nude Base Gel: Apply 1 to 2 coats of your favorite sheer nude-pink gel polish to give the nail beds a healthy, balanced glow. Cure each layer for 60 seconds.
- Map Out the French Smile Line:
- Using a fine liner brush dipped in soft white gel polish, mark three small reference dots: one at the apex of the curve on the center of the nail, and two on the lateral sides where the French line begins.
- Connect the dots in a smooth, sweeping concave arc that cradles the tip of the almond shape.
- Fill in the edge of the tip with white polish.
- Pro Tip: Use a flat clean brush dipped in alcohol to clean up any messy lines before curing.
- Cure: Cure the white French tip under the UV/LED lamp for 60 seconds.
Phase 3: Crafting the 3D Pink Ribbon Bows
This is the creative highlight of the manicure. Take your time with each nail:
- Prepare the Detail Gel: Place a small drop of high-viscosity pink gel (or mixed pink gel paint with clear builder gel for thickness) onto a palette.
- Draw the Center Knot:
- Using your ultra-fine detail brush, place a small dot of pink gel directly at the apex center of the French smile line.
- Draw the Ribbon Loops:
- From the center knot, draw two gentle teardrop-shaped loops expanding outward—one to the left and one to the right.
- Ensure the lines have enough gel volume so they remain raised off the nail surface in a 3D effect.
- Draw the Ribbon Tails:
- Extend two thin, sweeping lines downward from the central knot onto the white tip area to mimic the flowing ribbon tails.
- Add tiny dots at the end of the ribbon loops for added charm if desired.
- Flash Cure: Flash cure the nail under the UV lamp for 10–15 seconds immediately after drawing each bow to lock the 3D shape in place before moving to the next finger.
- Full Cure: Once all five fingers on a hand are completed, do a full 60-second cure.
Phase 4: Sealing, Top Coat, and Finishing Touches
- Top Coat Application:
- Apply a generous layer of non-wipe glossy top coat across the entire nail.
- Work carefully around the 3D bow details. You can trace around the raised bow structure with a thin brush to ensure the surrounding flat surfaces are completely glossy while preserving the raised texture of the ribbon.
- Final Cure: Cure under the UV/LED lamp for a full 60 to 90 seconds to maximize durability and high-wattage shine.
- Nourish: Allow the nails to cool for 30 seconds, then massage a rich cuticle oil into the skin surrounding each nail bed.
6. Variations & Customization Ideas
While the classic soft white and pink ribbon combination is stunning on its own, nail art is all about personal expression. Here are creative ways to customize this look:
1. The Velvet Bow Variant
Instead of smooth gel lines for the bows, apply a coat of pink magnetic “cat-eye” or velvet gel to the ribbon detailing before curing. Magnets pull sparkling metallic shimmer into the bow loops, creating a realistic satin ribbon effect.
2. Pearl-Centered Coquette Nails
Add a tiny flat-back pearl or micro-rhinestone directly in the center of each pink bow knot. This creates extra dimension and adds a touch of high-fashion glamour perfect for brides or special celebrations.
3. Chrome Accent Bows
Replace pastel pink gel paint with silver or gold chrome powder rubbed over raised 3D gel lines. Chrome bows paired with soft French tips offer a modern, cyber-coquette aesthetic that mixes edgy metallics with delicate shapes.
4. Color Inversion (Pink French with White Bows)
Flip the color scheme by creating soft pastel pink French tips paired with crisp white 3D ribbon details. This variation is especially popular for spring manicures and Easter-themed nail art.
7. Nail Maintenance: Keeping Your 3D Nail Art Flawless
Because this manicure incorporates raised 3D elements, proper daily maintenance is key to keeping your hands looking pristine for 3 to 4 weeks without snagging or chipping.
| Maintenance Tip | Purpose & Benefit | Recommended Frequency |
| Apply Cuticle Oil Daily | Keeps the natural nail bed flexible and hydrated, preventing lift near the cuticles. | Twice Daily (Morning & Night) |
| Wear Protective Gloves | Protects the 3D bow elements and top coat gloss from household cleaning chemicals and hot water. | During Dishwashing & Cleaning |
| Avoid Using Nails as Tools | Prevents leverage stress on almond tips that can lead to breakage or debonding of gel. | Always |
| Reapply Top Coat | Seals in micro-scratches and restores salon-level shine to the nail surface. | Once every 7-10 Days |
8. Frequently Asked Questions (FAQs)
Q1: How long does a 3D Pink Bow French Tip manicure last?
Answer: When applied correctly over properly prepped natural nails, gel builder, or acrylic extensions, this style typically lasts 3 to 4 weeks without chipping or losing its 3D bow texture.
Q2: Will the 3D bows snag on clothes or hair?
Answer: If the 3D gel is drawn smoothly with rounded edges and sealed thoroughly around its base with top coat, snagging is minimal. Ensuring there are no jagged edges during the drawing phase prevents hair or fabric threads from catching.
Q3: Can I create this design on short nails?
Answer: Yes! While almond nails provide extra space for long French tips, short oval or squoval nails look equally charming with delicate mini-bows centered on thin micro-French lines.
Q4: How do I remove 3D gel bow nail art safely without damaging my natural nails?
Answer: Gently file down the top coat and the raised 3D bow structure using a coarse nail file (100/180 grit) to break the gel seal. Then, soak cotton pads in pure acetone, place them over the nails, wrap with aluminum foil, and wait 15–20 minutes before gently scraping off softened gel with a wooden cuticle stick.
9. Conclusion
The Pink Bow French Tip Almond Nail manicure is far more than a passing beauty trend—it is a sophisticated celebration of feminine art, precision, and modern aesthetic culture. By blending the structure of almond-shaped extensions, the clean symmetry of French tips, and the delightful texture of 3D ribbon accents, this look effortlessly elevates any outfit.
Whether you choose to recreate this romantic design in the comfort of your home using our step-by-step guide or visit a professional nail technician to bring your vision to life, this manicure promises to keep your hands looking elegant, stylish, and endlessly chic. Embrace the coquette movement, experiment with your favorite color variations, and let your fingertips make a beautiful fashion statement!


