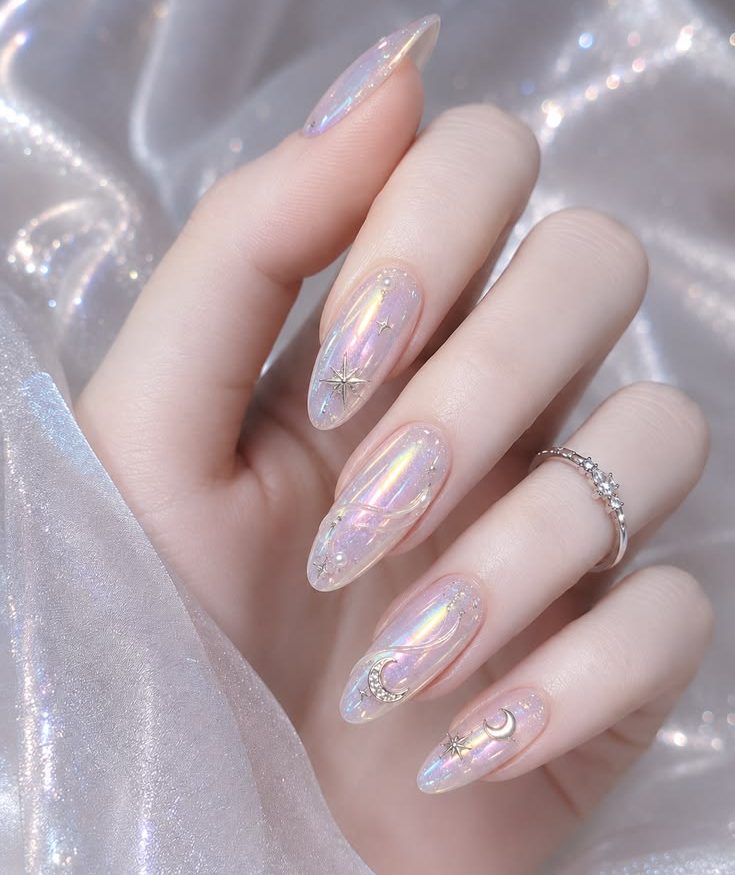
In the ever-evolving world of beauty and manicure trends, few aesthetics capture the imagination quite like celestial-inspired nail art. Blending dreamlike iridescence, pearlescent sheen, cosmic symbols, and delicate 3D embellishments, this dreamy nail design creates an ethereal look that feels straight out of a fairy tale.
If you are looking for your next manicure inspiration or want to learn how to recreate this breathtaking celestial glaze look at home or in the salon, this comprehensive guide covers everything from color selection to application techniques, maintenance, and styling tips.
What Is Celestial Iridescent Nail Art?
Celestial iridescent nail art combines shimmering, light-reflecting base finishes (such as chrome powders, pearl glazes, or magnetic cat-eye gels) with delicate cosmic elements like crescent moons, twinkling starbursts, pearls, and raised gel lines.
Key Characteristics of This Look
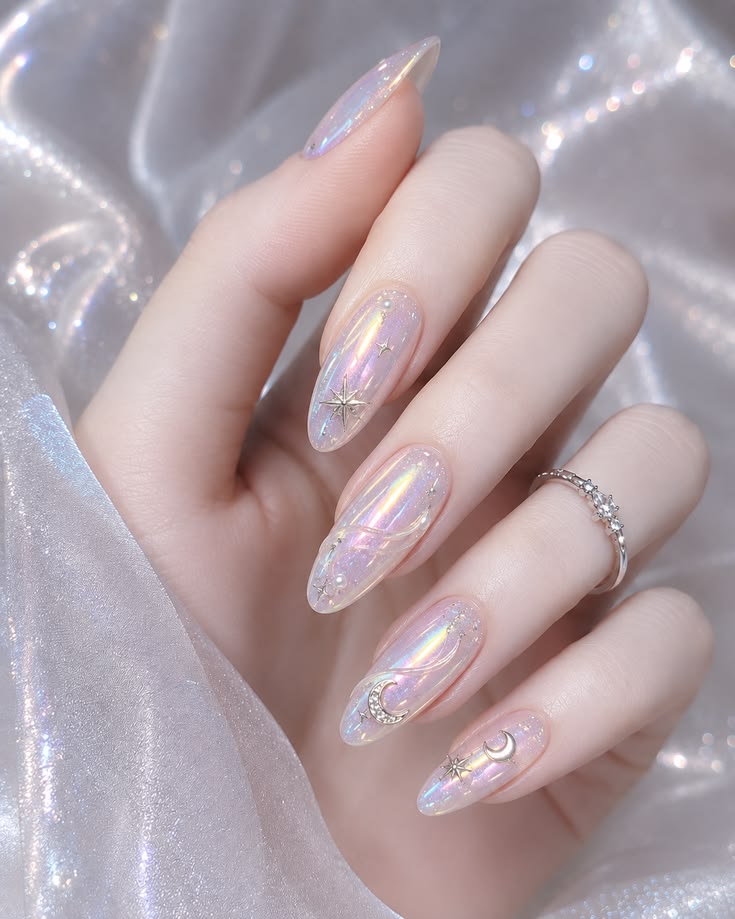
- Almond Shape Base: The long, sleek almond silhouette elongates the fingers while offering a smooth, elegant canvas for intricate designs.
- Opaline & Aurora Glaze Base: Underneath the charms, a high-shine glaze reflects shades of pink, lavender, gold, and icy blue depending on how the light strikes.
- Metallic Celestial Charms: 3D silver and gold charms—including delicate crescent moons and four-point starbursts—add depth and luxury.
- Pearls and Rhinestone Accents: Tiny micro-pearls and clear crystals mimic distant stars and cosmic dust.
- Fluid 3D Swirl Lines: Raised gel swirls add dynamic texture and fluid movement across the nail bed.
Anatomy of the Look: Breaking Down the Design
To recreate this exact aesthetic, let’s take a closer look at each element used in this ethereal design.
+-----------------------------------------------------------------------+
|                        CELESTIAL NAIL DESIGN                          |
+-----------------------------------------------------------------------+
|  [Base Layer]      -> Translucent Sheer Nude / Milky Gel              |
|  [Shine Effect]    -> Aurora / Chrome / Opal Chrome Powder            |
|  [Texture]         -> Clear Builder Gel Swirls & 3D Ribbons          |
|  [Charms & Details]-> Silver Crescent Moons, Starbursts, Micro Pearls|
|  [Finish]          -> High-Gloss Gel Top Coat                         |
+-----------------------------------------------------------------------+
1. The Sheer Opal Base
Rather than starting with a heavy, opaque polish, this style relies on a translucent or semi-shear background. A soft jelly pink or milky white gel provides a natural, glass-like illusion.
2. The Holographic / Chrome Reflectivity
The magic of this manicure lies in its multidimensional shimmer. Applying an iridescent chrome powder (often called Aurora Powder or Unicorn Dust) over the cured gel layer produces an opalescent effect that shifts from warm peach to cool violet under direct light.
3. Metallic Cosmic Charms & 3D Gel Work
- Crescent Moons: Positioned along the lunula or tip to frame the nail gracefully.
- North Star / Starburst Emblems: Placed in the center of the accent nails to serve as focal points.
- Embossed Swirls: Clear hard gel or sculpture gel is piped onto the surface to create wave-like textures before applying topcoat.
- Pearl & Gem Inlays: Tiny pearl studs and petite rhinestones complete the galaxy effect.
Step-by-Step Tutorial: How to Achieve This Look at Home
Whether you are a DIY nail artist or preparing a reference for your professional nail technician, here is the complete step-by-step process.
+-------------------------------------------------------------------+
|                        STEP-BY-STEP PROCESS                       |
+-------------------------------------------------------------------+
|  Step 1: Prep & Shape (Almond outline, cuticle care)              |
|  Step 2: Base Coat & Sheer Nude Polish (Cure 60s)                 |
|  Step 3: Non-Wipe Top Coat + Aurora Chrome Rubbing                |
|  Step 4: 3D Gel Swirl Piping & Curing                             |
|  Step 5: Charm Placement (Gems, Moons, Stars with Rhinestone Glue)|
|  Step 6: Final Seal with High-Gloss Gel Topcoat                   |
+-------------------------------------------------------------------+
Required Materials & Tools
- Nail Prep: Nail file (180/240 grit), cuticle pusher, dehydrator, and primer.
- Gel Polishes: Base coat, translucent jelly nude/pink polish, non-wipe top coat.
- Effects: White or clear Aurora chrome powder, silicone applicator tool.
- Art Gel: Clear builder gel, sculpture gel, or 3D piping gel.
- Charms & Embellishments:
- Mini silver crescent moon metal charms
- Silver starburst/North Star charms
- Micro white pearls
- Petite clear flatback rhinestones
- Adhesive & Lights: Nail charm resin/rhinestone glue, fine liner brush, and a UV/LED lamp (at least 48W).
Step 1: Preparation and Nail Shaping
- Clean your natural nails and push back cuticles gently.
- File your nails into an almond shape, tapering the sides evenly toward a smooth, rounded point.
- Lightly buff the surface of the nail bed to remove shine and increase gel adhesion.
- Apply nail dehydrator followed by a acid-free primer.
Step 2: Apply the Sheer Base
- Apply a thin layer of gel base coat and cure under your UV/LED lamp for 60 seconds.
- Apply 1 to 2 thin coats of translucent sheer nude or pastel jelly gel. Cure each layer for 60 seconds.
Step 3: Burnish the Aurora Chrome Powder
- Apply a layer of non-wipe gel topcoat and cure for approximately 30 seconds (it should be slightly warm/tacky to hold powder, depending on your brand).
- Using a silicone applicator or eyeshadow sponge, gently rub the Aurora chrome powder across the entire nail surface until a smooth, mirror-like opalescent finish forms.
- Dust away excess powder with a soft brush.
Step 4: Add 3D Fluid Swirl Lines
- Dip a fine detail liner brush into clear 3D gel or builder gel.
- Trace fluid, elegant curved lines across the nail bed to create dimensional swirls.
- Cure under the LED lamp for 30–60 seconds to lock the raised lines in place.
Step 5: Secure the Celestial Charms
- Place small dots of thick rhinestone gel or charm glue at key focal points (e.g., center of the ring finger or base of the pointer finger).
- Using jewel pickers or tweezers, place your silver crescent moon, starburst charms, and micro pearls into the glue.
- Adjust placement before flash-curing under a mini handheld UV torch.
- Perform a full 60-second cure in the main LED lamp.
Step 6: Seal and Protect
- Use a fine brush to apply top coat around the 3D charms to secure their edges without hiding their metallic detail.
- Apply a generous layer of high-gloss top coat over the remaining areas to seal in the chrome powder and 3D gel lines.
- Cure for a final 60–90 seconds. Apply cuticle oil to finish.
Pro Tips for Longevity and Shine
| Tip Category | Recommendation | Why It Matters |
| Edge Sealing | Seal free edges with base and top coats. | Prevents premature chipping and chrome peeling. |
| Charm Placement | Cap charm edges with builder gel. | Keeps metal pieces from catching on hair or clothes. |
| Chrome Application | Use non-wipe top coat for rubbing powder. | Ensures a glassy mirror sheen without graininess. |
| Aftercare | Apply cuticle oil daily and wear gloves for chores. | Maintains hydration and protects the gel finish. |
Color Variations & Alternative Styles
While the classical opalescent silver version is timeless, you can easily adapt this celestial concept into different color palettes:
                     CELESTIAL PALETTES
                     /        |        \
                    /         |         \
         Midnight Blue    Rose Gold    Emerald Cosmic
         (Dark Base)     (Warm Tone)   (Moody Elegance)
- Midnight Cosmic Galaxy: Swap the nude base for deep navy, dark violet, or jet black. Apply magnetic cat-eye gel under dark blue aurora powder to mimic deep night skies.
- Rose Gold Dream: Replace silver charms with warm rose-gold moons and starbursts, paired with a warm peachy-pink chrome finish.
- Icy Winter Starlight: Use a icy blue jelly base with silver glitter dust and snow-white pearl accents for a crisp, cool aesthetic.
Styling & Accessories Pairing
This ethereal manicure pairs beautifully with minimalist and delicate jewelry. Consider layering:
- Thin sterling silver or white-gold band rings
- Dainty solitaire diamond or CZ rings
- Silky fabrics like organza, satin, or tulle that complement the dreamy reflection of the aurora finish
Frequently Asked Questions (FAQ)
How long does celestial gel nail art last?
When properly applied with high-quality gel products and capped around 3D charms, this manicure typically lasts 2 to 3 weeks without losing its shine or losing charms.
Will 3D metal charms snag on clothes?
If charms are secured solely with basic polish, they can snag. However, encapsulating their outer edges with a small bead of hard gel or rhinestone glue rounds off sharp corners, preventing snags.
Can I do this on natural nails, or do I need extensions?
You can create this look on both natural nails and extensions! While medium-to-long almond extensions provide more room for charms, shorter natural nails can feature smaller starburst decals and chrome finishes.
Final Thoughts
Celestial iridescent nail art combines subtle elegance with eye-catching detail. Its play of light, metallic textures, and starry charms make it a versatile choice for weddings, special occasions, or everyday glam. Try this celestial design for your next nail session and enjoy carrying a piece of the cosmos at your fingertips!