Whether you are preparing for a wedding, updating your everyday minimalist look, or simply love soft aesthetic beauty, strawberry milk gradient nails offer a fresh, healthy appearance that flatters every skin tone and nail shape.
In this ultimate guide, we will explore everything you need to know about this aesthetic manicure—from why it is taking over social media to a complete step-by-step DIY tutorial, professional secrets for longevity, and creative design variations.
What Are Strawberry Milk Ombré Nails?
Strawberry milk ombré nails—often referred to as blush nails, jelly pink gradients, or strawberry glazed manicures—combine two major beauty phenomena: milky translucent finishes and delicate color blending.
Key Characteristics of the Look:
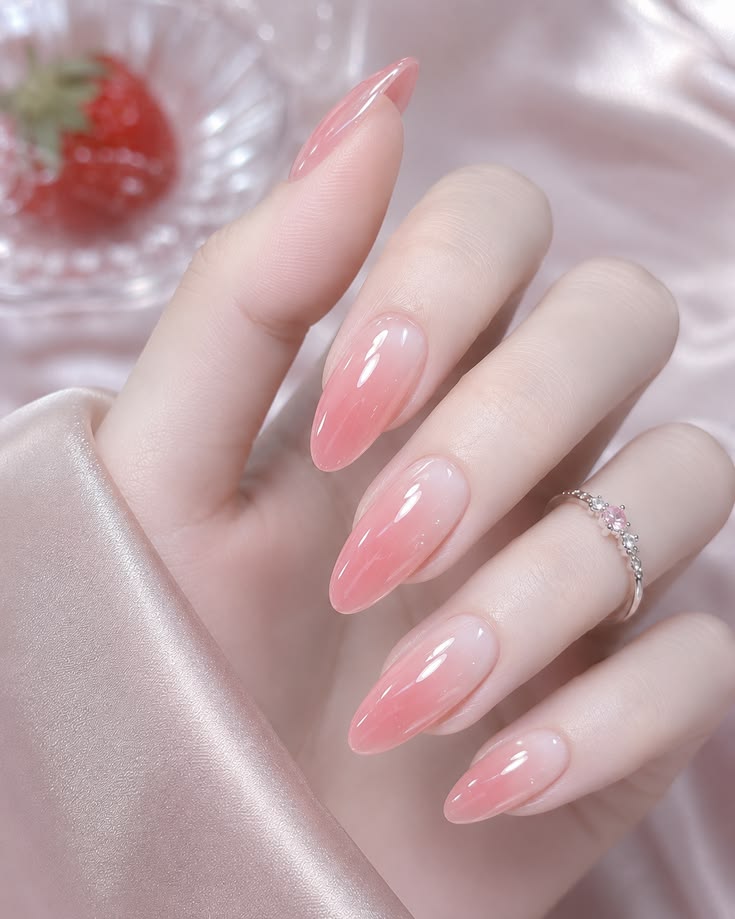
- The Color Palette: Soft ivory, sheer cream, or translucent pinkish-nude blending into a warm, glossy strawberry hue.
- The Gradient Effect: A soft blur without harsh lines, creating a subtle gradient effect.
- High-Gloss Finish: A glass-like, syrup glaze top coat that reflects light beautifully.
- Flattering Nail Shape: While stunning on any length, this gradient particularly elongates the fingers when paired with almond or oval-shaped nails.
Why Is This Trend So Popular?
1. Universally Flattering Across All Skin Tones
Unlike harsh neon pinks or chalky opaque whites, strawberry milk tones have a subtle warmth and natural translucency. This sheer qualities allow your natural nail bed shade to enhance the polished polish, creating a customized tint unique to your hand.
2. Low-Maintenance Growth
Because the color near the cuticle is sheer or nude-toned, nail regrowth is far less noticeable compared to full-coverage dark polishes or stark white french tips. This makes strawberry ombré an exceptionally low-maintenance option that can last weeks without looking overdue for a touch-up.
3. Ultimate Versatility
This style smoothly transitions between casual daylight settings and formal evening occasions. It provides a minimalist canvas that complements delicate ring jewelry, fine fabrics, and cozy knitwear effortlessly.
Essential Tools & Materials Needed
To achieve a flawless, salon-grade strawberry milk gradient at home, gather the following supplies:
| Product Category | Tool / Item Needed | Recommended Purpose |
| Nail Prep | Nail file (180/240 grit) & Buffer | Shaping and smoothing the natural nail surface |
| Cuticle Care | Cuticle pusher & Cuticle oil | Clearing dead skin to ensure smooth polish application |
| Bases & Top Coats | Dehydrator, Primer, Base Coat, Ultra-Glossy Top Coat | Ensuring maximum adhesion and high-shine glass finish |
| Color Polish | Milky White/Nude Jelly Gel & Sheer Strawberry Pink Gel | Creating the translucent gradient layers |
| Blending Tools | Micro-foam sponge, Ombré brush, or Blooming gel | Seamlessly blending color transitions |
| Protection | Liquid latex or barrier tape | Keeping skin around cuticles clean during sponging |
Step-by-Step Tutorial: How to Achieve Strawberry Milk Gradient Nails at Home
Creating a seamless gradient with gel polish or regular polish requires patience and the right technique. Follow this step-by-step guide to get professional results.
Step 1: Prep & Prime ➜ Step 2: Milky Base ➜ Step 3: Gradient Blend ➜ Step 4: High-Gloss Top Coat
Step 1: Meticulous Nail Preparation
A manicure is only as good as the preparation behind it.
- File and Shape: File your nails into an almond or oval shape to emphasize finger elongation.
- Buff Lightly: Remove the surface shine from your natural nail plate using a fine-grit buffer.
- Cleanse: Wipe away residual dust using an alcohol wipe or nail cleanser to remove oil.
- Dehydrate & Prime: Apply a dehydrator followed by an acid-free primer to ensure long-lasting polish adhesion.
Step 2: Apply the Milky Base Layer
- Apply a thin layer of clear base gel and cure under an LED/UV lamp for 60 seconds (or allow regular base coat to dry completely).
- Apply 1 to 2 coats of a sheer milky white or pale nude polish. This forms the soft background layer required for a seamless blend. Cure each layer thoroughly.
Step 3: Create the Strawberry Ombré Effect
There are two main methods to create this gradient:
Method A: The Sponge Technique (Best for Beginners)
- Protect your surrounding skin with liquid latex.
- Apply a small stripe of milky polish and strawberry pink polish directly onto a makeup sponge so they overlap slightly.
- Gently dab the sponge onto the upper two-thirds of your nail, building the color towards the tip.
- Repeat in light layers, curing between applications, until you reach your desired color intensity.
Method B: The Blooming Gel / Blending Brush Technique (Best for Gel Users)
- Apply a thin coat of blooming gel or clear builder gel without curing.
- Place a drop of sheer strawberry gel near the center/tip of the nail.
- Use a soft ombré fan brush or clean gel brush to tap and disperse the pink pigment upward and downward, letting it blend naturally into the uncured gel base.
- Flash cure for 10–15 seconds once the blend looks smooth, then perform a full cure.
Step 4: Seal with a Super-Glossy Top Coat
The signature hallmark of strawberry milk nails is their juicy, glass-like finish.
- Apply a generous layer of a non-wipe high-shine gel top coat.
- Hold your hand upside down for 5 seconds before curing; this allows the top coat to self-level for a smooth reflection.
- Cure for 60–90 seconds under your UV/LED lamp.
- Finish by massaging a drop of nourishing cuticle oil around your cuticles.
Pro Tips for Maintaining Your Manicure
To keep your manicure looking fresh and vibrant for up to 3–4 weeks:
- Wear Protective Gloves: Always wear household gloves while washing dishes or cleaning with chemicals to prevent lifting and premature dullness.
- Hydrate Daily: Apply cuticle oil twice a day to maintain hydration around the nail bed and prevent cuticle peeling.
- Avoid Using Nails as Tools: Do not use your nails to open cans or peel stickers, as this can cause chipping at the tips.
- Cap the Free Edge: When applying base coats, polishes, and top coats, always sweep the brush along the free edge of your nail to seal the tips completely.
Top Creative Variations of Strawberry Ombré Nails
While the classical gradient is stunning on its own, you can customize this versatile design with elevated details:
1. Delicate Rhinestone & Ring Accents
Pair your gradient manicure with minimalist jewelry like delicate pink crystal rings or subtle micro-rhinestones near the cuticle. This enhances the elegant aesthetic without overpowering the look.
2. Glazed & Chrome Finishes
Overlay your strawberry gradient with a layer of pearl or white chrome powder before sealing with a top coat to achieve an ethereal, pearlescent glow similar to the glazed donut nail trend.
3. French Tip Hybrid
Combine a classical French tip line over the soft ombré background for a structured, modern twist on a traditional favorite.
4. Coquette-Style Bow Art
Add hand-painted white bow details or tiny pearl charms to individual accent nails to embrace a romantic, fairytale-inspired coquette aesthetic.
Frequently Asked Questions (FAQ)
Q1: Can I create strawberry milk ombré nails on natural nails?
Yes! You do not need acrylic extensions or gel tips to achieve this look. As long as your natural nails are prepped properly, you can use regular nail polish, dip powder, or gel polish on your natural nail plate.
Q2: How do I prevent my gradient from looking patchy?
The key to a smooth gradient is applying multiple thin layers rather than one thick layer. Using jelly or translucent polishes makes blending much easier than using heavy, opaque polishes.
Q3: What nail shape works best with strawberry gradient nails?
While square, squoval, and round nails look great, almond and oval shapes are considered ideal. These elongated shapes maximize the canvas size for the gradient to transition smoothly from nude to pink.
Summary
The strawberry milk ombré nail trend is a timeless choice that combines modern subtlety with romantic charm. Its translucent hues, delicate color shifts, and brilliant shine offer a versatile look suitable for any season, event, or personal style. By following the proper preparation, layering techniques, and maintenance routines detailed above, you can enjoy this gorgeous, salon-quality aesthetic right from home.