This comprehensive guide covers everything you need to know about replicating, styling, and maintaining this stunning nail art design. Whether you are a professional nail technician looking for design inspiration or a DIY enthusiast aiming to elevate your manicure game, this in-depth article explores the elements, step-by-step techniques, color psychology, and expert maintenance tips for achieving high-end chocolate and gold marble nails.
1. Deconstructing the Design: Elements of Luxury Nail Art
The manicure shown in the image represents a masterclass in texture, depth, and color contrast. Rather than applying a single uniform shade across all fingers, this set incorporates multiple advanced nail art techniques across individual nails to create a cohesive yet dynamic look.
Key Design Components:
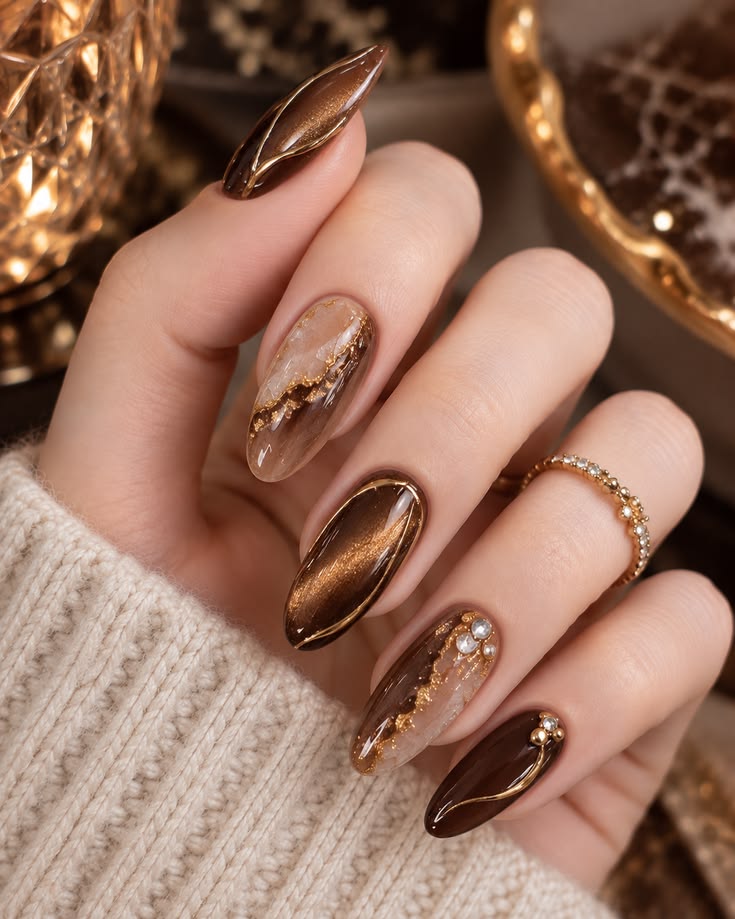
- Rich Chocolate Brown Base: Deep, velvety brown polish forms the foundational shade, offering a warm alternative to traditional black or navy winter shades.
- Cat-Eye / Magnetic Polish Effect: Select nails feature a reflective cat-eye sheen that catches the light from different angles, adding three-dimensional depth and a metallic luster.
- Smoky Quartz Marble Texture: Accent nails showcase a translucent, quartz-like marble effect blending nude, milky white, and warm amber-brown tones.
- Gold Foil & Metallic Wire Outline: Intricate gold leafing runs through the marble fault lines, while delicate 3D gold wire framing outlines the perimeter of the nails.
- Rhinestone & Pearl Embellishments: Subtle clusters of tiny pearls, clear crystals, and gold studs are strategically placed near the cuticle area to elevate the overall design with a touch of jewelry-inspired sparkle.
- Almond Shape & Medium-Long Length: The elegant oval/almond shape elongates the fingers and provides a graceful canvas for detailed artwork.
2. Why Warm Chocolate & Gold Colors Dominate Modern Trends
Color selection plays a fundamental role in nail design. Neutral tones like nude and beige remain classic choices, but richer earth tones—specifically chocolate brown, espresso, warm taupe, and bronze—have skyrocketed in popularity across seasonal fashion cycles.
The Aesthetics of Deep Brown:
- Sophistication: Brown serves as a rich, grounding tone that pairs effortlessly with cozy knitwear, leather accessories, and autumn/winter wardrobes.
- Versatility: Unlike bright neon shades or ultra-stark blacks, deep chocolate tones complement a wide variety of skin undertones, offering a softer yet deeply luxurious appearance.
- Depth & Texture: When combined with glossy gel topcoats, chocolate shades mimic rich materials like obsidian, tortoiseshell, dark mahogany, and molten caramel.
The Magic of Metallic Gold Accents:
- Contrast: Bright gold accents pop brilliantly against dark espresso backgrounds, creating visual drama without looking overly cluttered.
- Opulence: Gold foil and 3D metallic wire give nails a handcrafted, jewelry-like quality.
- Harmonious Warmth: Gold and warm brown share golden undertones, ensuring the design feels balanced rather than mismatched.
3. Step-by-Step Guide: How to Create Chocolate Gold Marble Nails
Recreating this luxury manicure requires precision, proper tools, and structured preparation. Below is a complete professional step-by-step tutorial for creating this look using gel polish.
Required Tools and Materials:
- Nail Prep: Nail file, buffer, cuticle pusher, dehydrator, and acid-free gel primer.
- Base & Top Coat: Gel base coat, non-wipe glossy top coat, and matte top coat (optional for texture contrast).
- Color Gel Polishes:
- Deep chocolate brown gel polish
- Brown magnetic/cat-eye gel polish + magnet wand
- Semi-translucent milky nude gel polish
- Nail Art Supplies:
- Fine detail liner brush
- Gold foil flakes / transfer foil
- Metallic gold 3D painting gel or fine gold art wire
- Mini nail pearls, flatback rhinestones, and tiny gold micro-beads
- Rhinestone glue or solid builder gel
- UV/LED curing lamp
Phase 1: Natural Nail Preparation
- Sanitize & Shape: Sanitize your hands and shape the natural nails (or extensions) into an almond or soft oval shape.
- Cuticle Care: Gently push back the cuticles and trim any dead skin. Lightly buff the shine off the surface of the nail plate with a fine-grit buffer.
- Dehydrate & Prime: Wipe the nails with isopropyl alcohol or acetone to remove oils. Apply a thin layer of nail dehydrator followed by a gel primer to ensure long-lasting adhesion.
Phase 2: Base Coat & Solid / Cat-Eye Application
- Base Coat: Apply a thin layer of gel base coat and cure in the LED lamp for 60 seconds.
- Solid Espresso Nails: On designated nails (such as the pinky or index finger), apply two thin coats of deep chocolate brown gel polish. Cure each layer for 60 seconds.
- Cat-Eye Effect: On nails where a dimensional shimmer is desired, apply a layer of magnetic brown cat-eye polish. Hold the magnet diagonally above the uncured polish for 5–10 seconds until the luminous streak forms. Immediately cure under the LED lamp for 60 seconds to lock the magnetic particles in place.
Phase 3: Crafting the Marble Accent Nail
- Milky Base Layer: Apply a layer of semi-translucent nude or milky white gel polish onto the accent nail. Do not cure yet.
- Swirling the Veins: Dip a fine liner brush into deep chocolate brown polish. Paint organic, jagged diagonal lines across the wet base layer.
- Blooming Effect: Use a clean brush dampened with a drop of clear base coat or gel cleanser to feather out the edges of the brown lines, creating a soft, natural stone bloom effect.
- Cure: Once satisfied with the marble pattern, cure in the lamp for 60 seconds.
Phase 4: Adding Gold Leaf, 3D Wire Framing & Embellishments
- Gold Foil Application: Press small fragments of gold transfer foil onto the tacky layer along the center of the marble vein to add metallic sparkle.
- 3D Metallic Outline: Using a high-density metallic gold art gel and a long detail brush, paint a delicate line following the outer perimeter of selected nails or along the marble fault lines. Cure for 60 seconds.
- Gem Placement: Place a small bead of solid builder gel or gem glue near the cuticle area of your chosen accent nail. Arrange small pearls, gold micro-beads, and rhinestones into a neat cluster. Cure under the lamp for 60 seconds to ensure the gems are securely anchored.
Phase 5: Final Top Coat & Polish
- Sealing the Art: Apply a thick layer of high-shine, non-wipe gel top coat over the entire nail surface, carefully floating the brush over gold foil and around the edges of the rhinestones to prevent snagging.
- Final Cure: Perform a full 60 to 90-second cure under your LED lamp.
- Hydration: Allow the nails to cool for 30 seconds, then massage a rich cuticle oil into the surrounding skin to restore moisture and achieve a salon-quality finish.
4. Care and Maintenance Tips for Long-Lasting Nail Art
Intricate nail art featuring 3D elements, gold wire, and rhinestones requires proper care to prevent lifting, chipping, or loss of embellishments. Follow these essential maintenance guidelines to keep your manicure looking fresh for up to 3 to 4 weeks:
1. Protect Your Nails from Everyday Wear
- Wear Gloves During Chores: Harsh household cleaning chemicals, dish soaps, and hot water can degrade gel polish adhesion and cause lifting. Always wear rubber gloves when washing dishes or cleaning.
- Avoid Using Nails as Tools: Never use the tips of your nails to open cans, peel stickers, or unfasten keychains. Put pressure on the pads of your fingers instead.
2. Hydrate Daily
- Cuticle Oil Application: Apply cuticle oil at least once or twice daily. Keeping the surrounding skin and nail bed hydrated prevents premature lifting at the cuticle edge and keeps the gel flexible.
- Hand Cream: Use a moisturizing hand cream containing shea butter or vitamin E to maintain smooth skin that highlights your manicure.
3. Handle Embellishments with Care
- Avoid Excessive Heat: Prolonged exposure to extremely hot water (such as long saunas or hot baths) can soften certain gel adhesives, causing rhinestones or pearls to detach.
- Top Coat Refresh: If you notice the shine fading after two weeks, gently buff the surface of non-textured areas, wipe clean with alcohol, and apply a fresh layer of gel top coat.
5. Outfit and Styling Ideas to Match This Manicure
A dramatic manicure like chocolate marble and gold serves as a key fashion accessory. Pairing your nails with complementary outfits, jewelry, and makeup enhances your overall look.
| Style Category | Recommended Pairings |
| Knitwear & Cozy Wear | Cream, beige, camel, and off-white chunky knitted sweaters create a stunning visual contrast against deep chocolate nails. |
| Formal & Evening Attire | Sleek black silk dresses, deep emerald gowns, or tailored velvet blazers match the luxurious gold and dark tones. |
| Jewelry Selection | Stackable yellow gold rings, delicate beaded bands, and gold bangles echo the 3D metallic wire and gold foil accents. |
| Makeup Coordination | Warm bronze eyeshadows, nude lipsticks with brown undertones, or rich espresso eyeliners complement the warm color palette. |
6. Summary: The Timeless Appeal of Luxury Earth Tones
The combination of deep chocolate brown, quartz-like marble textures, and radiant gold accents creates a timeless nail art design that strikes a balance between bold elegance and refined sophistication. By incorporating tactile elements like cat-eye shimmer, 3D wire framing, and small pearl embellishments, this look demonstrates how modern nail techniques can transform a classic shade into a captivating piece of wearable art.