The image above highlights the absolute pinnacle of this new movement: The 2026 Pearl & Shell Shimmer Aesthetic. Featuring delicate pearl embellishments, raised 3D wave textures inspired by sea shells, soft iridescent cat-eye or chrome bases, and fine metallic gold threading, this look represents the ultimate fusion of bridal elegance, mermaidcore romance, and clean-girl aesthetic sophistication.
In this comprehensive guide, we will break down everything you need to know about this trending 2026 nail design, including step-by-step application tutorials, structural nail care tips, color variations, expert techniques, and long-term maintenance secrets.
Key Elements of the 2026 Signature Nail Trend
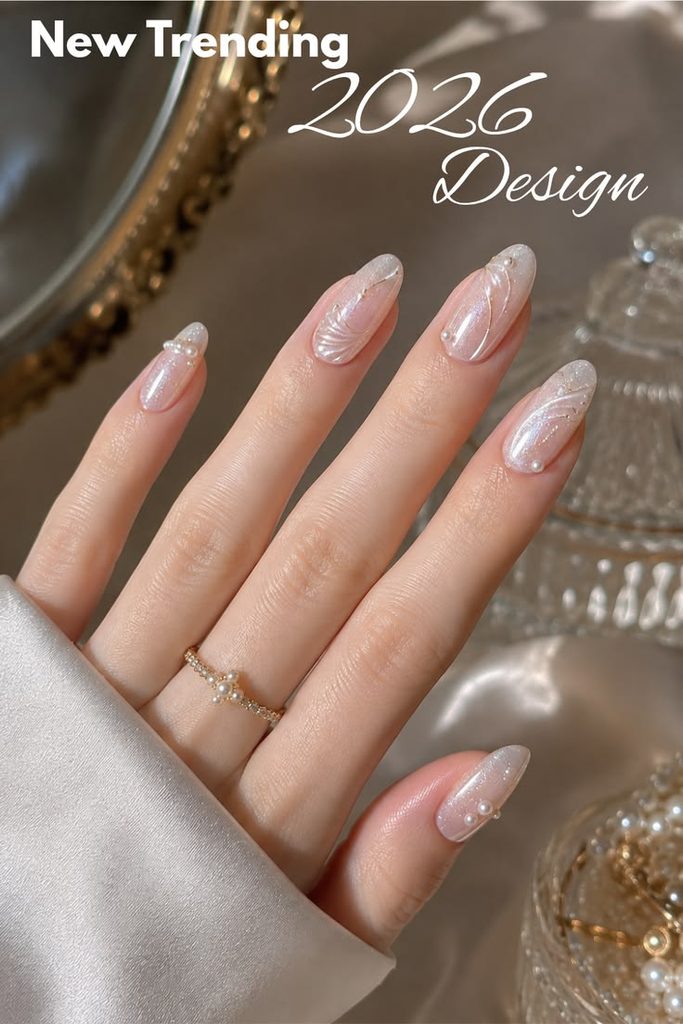
To truly appreciate and recreate this trending 2026 design, it helps to analyze the intricate components that make it stand out. This design combines multiple high-level nail techniques into a harmonious, balanced masterpiece.
1. The Sheer Iridescent Base (Velvet & Chrome Glow)
The foundation of this manicure is a soft, milky white or translucent nude gel base infused with micro-shimmer.
- Cat-Eye Effect: A subtle magnetic cat-eye gel provides a velvety, liquid-light illusion that catches the sun from every angle.
- Pearl Chrome Dust: Over the base gel, a fine pearl chrome powder is buffed to create a satin-like reflective sheen, giving the nails a radiant, natural glow rather than a harsh mirror shine.
2. Tactile 3D Textured Shell Art
One of the defining features of 2026 nail art is relief texture—art you can physically feel.
- Sculpted Ridges: Using clear structure gel or solid builder gel, subtle curved lines are sculpted onto the ring and middle fingernails to mimic the natural ridges of sea shells or soft silk waves.
- Dimensional Depth: The raised gel traps light differently than the flat base, creating a mesmerising multi-dimensional effect without adding visual clutter.
3. Pearl and Bead Embellishments
Pearls are the undisputed crowning jewel of 2026 nail aesthetics.
- Placement: Tiny, flat-backed micro-pearls are placed near the cuticle lines and along the sculpted gel ridges to add vintage elegance.
- Proportion: Varying the pearl sizes—combining ultra-small micro-beads with slightly larger center accent pearls—creates a custom, high-end jewelry appearance on each finger.
4. Fine Metallic Gold & Glitter Line Art
To elevate the look further, ultra-thin gold lines are hand-painted along the sculpted curves.
- Precision Accent: Using a fine liner brush and liquid gold gel painting polish, delicate swoops and tiny dots are added to frame the pearl accents.
- Balanced Glamour: The gold highlights give a subtle nod to fine jewelry and warm vintage frames, balancing the cool pearlescent base.
Step-by-Step Tutorial: How to Recreate This Look
Whether you are a professional nail technician or an avid DIY nail artist, achieving this high-end look requires patience, precision, and the right layer-by-layer method.
+-----------------------------------------------------------------------+
|                       APPLICATION WORKFLOW                            |
+-----------------------------------------------------------------------+
| 1. Preparation   --> Clean, shape, buff, and apply acid-free primer.  |
| 2. Base Layer    --> Milky nude base gel + cure under UV/LED light.   |
| 3. Shimmer Sheen --> Pearl chrome powder or velvet cat-eye layer.     |
| 4. 3D Sculpting  --> Draw soft ridges using thick hard builder gel.   |
| 5. Accent Detailing --> Paint micro gold lines & secure micro-pearls. |
| 6. Final Seal    --> Apply non-wipe topcoat; seal around pearl bases. |
+-----------------------------------------------------------------------+
Tool & Material Checklist
Before beginning, ensure you have the following supplies on your workstation:
- Prep Essentials: Dehydrator, acid-free gel primer, 180-grit buffer, almond/oval nail tips or natural nail prep tools.
- Base & Color Gels: Milky nude or sheer baby pink gel polish, translucent pearl magnet cat-eye gel, non-wipe topcoat, matte topcoat (optional for texture contrast).
- Sculpting Medium: High-viscosity clear sculpting gel, solid gel, or thick builder gel in a bottle (BIAB).
- Art Details: Pearl chrome powder, fine gold gel painter, micro flat-back pearls (sizes 1mm to 2.5mm), rhinestone gem glue/structure gel.
- Brushes & Lamps: Fine liner brush (7mm–9mm), silicon applicator for chrome, dotting tool, high-power LED/UV lamp.
Step-by-Step Execution Guide
Step 1: Prep and Shape the Nail Plate
- Push back the cuticles gently and trim any excess dead skin using sterile cuticle nippers.
- File the free edge into an Almond or Oval shape. These elongated shapes best complement the fluid lines of shell texture art.
- Lightly buff the surface with a 180-grit buffer to remove natural oils.
- Wipe the nail clean using a lint-free wipe saturated with 99% isopropyl alcohol. Apply nail dehydrator followed by an acid-free primer.
Step 2: Apply Base and Color Polish
- Apply a thin layer of rubber base gel or structure builder gel to strengthen the natural nail. Cure under a LED lamp for 60 seconds.
- Apply one to two thin coats of milky white or semi-sheer nude gel polish. Cure each layer for 60 seconds.
- Optional Cat-Eye Step: Apply a thin coat of translucent magnetic cat-eye gel. Use a magnet wand held diagonally across the nail to draw the shimmer to the center, creating a soft velvet beam. Cure for 60 seconds.
Step 3: Buffing the Pearl Chrome Finish
- Apply a thin layer of non-wipe topcoat and cure for 30 seconds (it should be slightly warm/tacky to hold chrome powder properly).
- Using a silicone brush or eyeshadow applicator, gently rub white pearl chrome powder over the entire surface until a smooth, mirror-like pearl shine appears.
- Dust off any excess powder using a soft dust brush.
Step 4: Sculpting the 3D Shell Ridges
- Take a fine detail liner brush dipped in high-viscosity clear builder gel or 3D sculpting gel.
- Starting near the cuticle area, gently drag fluid, curved lines down toward the free edge, mimicking shell grooves.
- Do not cure immediately—allow the gel a few seconds to self-level slightly so the edges remain rounded rather than sharp.
- Flash cure under a UV/LED light for 10–15 seconds to freeze the shape, then move on to the next line. Once all ridges are complete, perform a full 60-second cure.
Step 5: Applying Gold Lines and Micro-Pearls
- Dip your fine liner brush into gold gel paint. Paint micro-thin accent lines along the valleys between the 3D gel ridges.
- Place a small bead of strong gem gel or builder gel near the cuticle or along the ridges where you want to place the pearls.
- Using a wax pencil or dotting tool, place your micro-pearls onto the uncured gem gel. Lightly press them into place.
- Cure fully for 60 seconds under your lamp.
Step 6: Topcoat and Edge Sealing
- Using a detail brush, carefully apply non-wipe topcoat around the bases of the pearls to lock them securely into place. Avoid capping over the pearls entirely, as covering them with topcoat can dull their realistic luster.
- Coat the rest of the nail plate with your glossy topcoat to seal the chrome and 3D ridges.
- Perform a final cure for 60–90 seconds. Finish with a dab of nourishing cuticle oil around the surrounding skin.
Structural Nail Comparison: Almond vs. Coffin vs. Square
While this 2026 trending design looks stunning on almost any hand, selecting the right nail shape enhances the visual impact of 3D shell and pearl embellishments.
| Nail Shape | Suitability for Shell Art | Visual Impression | Recommended Length | Maintenance Level |
|---|---|---|---|---|
| Almond (Featured) | Highest / Ideal | Elongates fingers, organic curves match wave patterns | Medium to Long | Moderate |
| Oval | High | Soft, natural, elegant daily wear | Short to Medium | Low |
| Coffin / Ballerina | Moderate | Edgy modern contrast against delicate pearls | Long | High |
| Square | Low | Sharp corners can visually clash with fluid organic art | Short | Low |
Design Variations for Different Occasions
This versatile 2026 design can easily be adapted to suit various personal styles, events, and seasonal trends.
1. The Modern Bridal Classic
Keep the base ultra-sheer with milky pinks, remove the gold line work, and stick exclusively to delicate micro-pearls and soft white chrome. This creates a timeless, romantic aesthetic perfect for modern brides, bridesmaids, or formal galas.
2. Ocean Mermaidcore (Summer Festival Edition)
Incorporate soft pastel gradients into the background before adding 3D texture. Blending pastel mint green, seafoam blue, and lilac under the pearl chrome base creates an ethereal underwater look perfect for summer vacations.
3. Golden Hour Luxe (Autumn / Evening Wear)
Swap white micro-pearls for soft champagne-gold pearls or small metallic beads. Use a warmer nude base to create an opulent, rich tone suited for fall fashion and red-carpet events.
Professional Tips for Long-Lasting 3D Pearl Nail Art
- Prevent Pearl Detaching: Micro-pearls have smooth, rounded surfaces that can snap off if only held by regular topcoat. Always anchor them into a thick dot of hard builder gel or specialized rhinestone gel glue, and create a tiny gel “collar” around the base of each bead before curing.
- Prevent Chrome Peeling: Pearl chrome powder tends to cause topcoat slippage if applied too thickly at the free edges. Always lightly file the free edge of the nail after applying chrome powder, and cap the tips thoroughly with base gel before topcoating.
- Keep Chrome Shiny: Avoid touching chrome powder with bare fingers before sealing, as skin oils can ruin the smooth metallic reflection.
Frequently Asked Questions (FAQs)
Q1: How long does this 3D pearl nail design typically last?
When executed with professional-grade builder gels and proper edge sealing, this manicure can comfortably last 3 to 4 weeks without losing pearls or lifting 3D gel texture.
Q2: Will the 3D textured ridges catch on hair or clothing?
If the 3D ridges are sculpted using smooth, self-leveling builder gel and sealed properly with a glossy topcoat, the surface will feel rounded and smooth to the touch rather than sharp, preventing it from catching on fabrics.
Q3: Can I create this look on short natural nails?
Absolutely! While almond shapes offer more surface area for intricate 3D ridges, this pearl and chrome style looks equally elegant as a minimalist accent on short, rounded natural nails.
Conclusion
The 2026 Pearl Shell Shimmer Manicure represents the perfect balance of modern nail tech artistry and timeless elegance. By blending soft pearlescent chrome, dimensional 3D gel sculpting, delicate micro-pearls, and subtle gold threading, this trend offers a sophisticated, high-end aesthetic suitable for any special occasion or everyday luxury. Try this design today to give your nails a fresh, radiant upgrade that stands at the forefront of modern beauty trends!