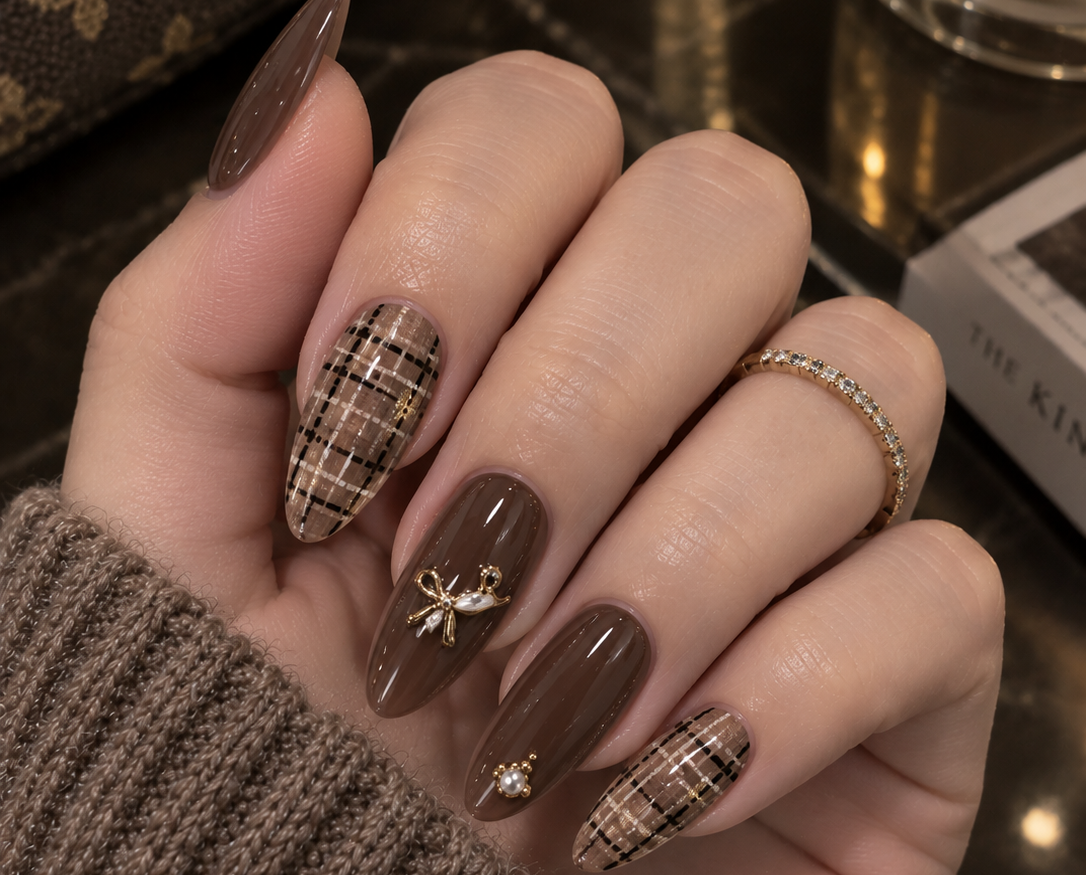
Combining rich chocolate brown glossy polishes, intricate Burberry-inspired plaid pattern accents, delicate gold 3D bow charms, and pearl stud details, this manicure style perfectly encapsulates the “Old Money” aesthetic and cozy sweater weather vibes.
Whether you are a seasoned nail tech looking for creative inspiration or a DIY nail enthusiast wanting to replicate this viral design at home, this comprehensive guide covers everything you need to know about creating, maintaining, and styling brown plaid luxury nails.
Why Brown Plaid & Tweed Nails are Trending
Nail trends cycle with seasons, but earth tones—especially rich browns, deep terracottas, warm caramels, and beige tones—remain eternal autumn and winter favorites. Here is why this specific design has taken the nail world by storm:
- The “Old Money” Aesthetic: The combination of classic British-inspired plaid (reminiscent of high-fashion Burberry prints), delicate pearls, and gold hardware gives off a high-end luxury vibe without being overly flashy.
- Cozy Texture Matching: Plaid patterns visually complement cozy textures like cashmere, wool coats, knit sleeves, and leather accessories.
- Versatility Across Nail Shapes: While shown here on elegant almond-shaped nails, this pattern transfers seamlessly onto coffin, square, squoval, or short rounded nails.
- Subtle Accent Balance: By alternating solid deep brown nails with delicate line work and 3D charms, the overall manicure remains balanced and polished rather than overwhelming.
Key Aesthetic Elements of the Design

To truly appreciate and recreate this manicure, let’s break down each element visible in the picture:
- Nail Shape & Length: Long Almond shape, providing a sleek, hand-elongating silhouette.
- Color Palette:
- Rich Chocolate Brown (Glossy finish)
- Warm Mocha/Taupe base for plaid pattern
- Crisp Black, White, and Fine Gold Glitter striping details
- 3D Nail Art Embellishments:
- Middle Finger: A metallic gold bow charm centered with a delicate white pearl bead.
- Ring Finger: Minimalist gold caviar bead micro-studs paired with a tiny pearl at the cuticle base.
- Pattern Technique: Hand-painted woven plaid/tweed pattern featuring clean horizontal and vertical lines with a textured canvas effect.
Tools and Products Needed for DIY Creation
Recreating this detailed manicure at home or in a salon setting requires specific tools and high-quality gel products to ensure longevity and crisp, clean lines.
Required Supplies:
| Category | Recommended Items |
|---|---|
| Base & Top Coat | Dehydrator, Acid-free Primer, Rubber Base Coat, High-Gloss Non-Wipe Top Coat |
| Gel Polishes | Deep Chocolate Brown Gel, Warm Nude/Taupe Gel, Black Art Gel, White Art Gel, Gold Fine Glitter Gel |
| Art Tools | Ultra-fine Long Liner Brush (7mm or 9mm), Dotting Tool, Nail Art Palette |
| Charms & Hardware | Gold Bow Metal Charms, Micro White Pearl Beads, Gold Caviar Beads |
| Adhesive & Lamp | Rhinestone Glue Gel / Builder Gel, LED/UV Curing Lamp (at least 48W) |
Step-by-Step Tutorial: Recreating Brown Plaid Nails
Follow this detailed step-by-step guide to achieve a flawless, salon-grade finish on natural nails, gel extensions, or press-on tips.
Step 1: Nail Preparation & Shaping
- Prep the Cuticles: Gently push back cuticles using a cuticle pusher and clean away dead eponychium skin.
- Shape the Nails: File the nails into a smooth Almond shape. Ensure the side walls are symmetrically tapered toward a soft rounded tip.
- Buff & Dehydrate: Gently buff the surface shine off with a 180/240 grit buffer. Cleanse thoroughly with 99% Isopropyl Alcohol or nail dehydrator to remove dust and oils.
- Base Layer: Apply a thin layer of acid-free primer followed by a high-adhesion Rubber Base Gel. Cure under the UV/LED lamp for 60 seconds.
Step 2: Painting the Base Colors
- Index Finger & Pinky Finger: Paint a layer of sheer-to-medium nude/mocha polish to serve as the background canvas for the plaid pattern. Cure for 30 seconds. Repeat for a second thin layer.
- Thumb, Middle, and Ring Fingers: Apply two thin, even coats of deep chocolate brown gel polish. Cure each layer for 60 seconds for full opacity.
Step 3: Hand-Painting the Tweed/Plaid Pattern
The plaid pattern on the index and pinky fingers requires a steady hand and a fine detail liner brush:
- Vertical Lines: Using your fine liner brush and black gel polish, draw two thin, parallel vertical lines running from the cuticle down to the tip. Cure for 30 seconds.
- Horizontal Lines: Draw evenly spaced horizontal lines across the nail to form a grid structure.
- White Accent Lines: Clean your brush, dip into crisp white gel art paint, and layer intersecting white lines slightly offset from the black lines. This creates depth and mimics woven fabric fibers.
- Gold Sparkle Accent: Draw fine lines of gold glitter polish alongside the grid intersection points to give a subtle holiday glow.
- Cure: Perform a full 60-second cure once the pattern looks balanced.
Step 4: Applying 3D Charms and Pearl Embellishments
Adding 3D elements requires proper gel adhesion so they remain secure for weeks without snagging on clothes or hair.
- Middle Finger (Bow Charm):
- Place a drop of heavy-viscosity builder gel or rhinestone glue gel in the center of the nail.
- Set the gold bow charm into the gel.
- Flash cure for 10–15 seconds to freeze it in place.
- Ring Finger (Pearl Studs):
- Place a small dot of gel adhesive near the base of the nail cuticle.
- Attach a tiny white pearl stud surrounded by two micro gold caviar beads.
- Full Securing: Use a fine liner brush to trace non-wipe gel around the edges of all metal and pearl charms to lock them into place.
- Cure: Complete a full 60-second UV/LED cure.
Step 5: Seal and Gloss
- Top Coat: Apply a thick layer of high-gloss Non-Wipe Top Coat over the solid brown nails and the plaid patterns.
- Around the Charms: Carefully brush top coat around the 3D bow and pearl charms using a detailed brush—avoid coating over the pearls directly, as top coat can mute their iridescent sheen.
- Final Cure: Cure for 90 seconds to ensure a glass-like finish.
- Nail Hydration: Finish by massaging nourishing cuticle oil into the surrounding skin.
Styling Tips: How to Wear and Pair Brown Plaid Nails
A luxury manicure deserves an equally polished look. Here is how you can style this aesthetic in everyday life:
- Knitwear & Sweaters: Pair this manicure with chunky cream sweaters, oversized taupe cardigans, or ribbed brown knit cuffs (as featured in the image) for a cozy look.
- Accessories: Gold jewelry—such as delicate pavé stacked rings or minimalist band rings—enhances the warm gold tones of the bow and stud accents.
- Handbags & Leather: Complementary accessories include monogrammed brown leather handbags (like Louis Vuitton monogram prints), leather boots, and classic trench coats.
- Fragrance Pairings: Complete the aesthetic sensory experience with warm scent notes like vanilla bean, warm amber, mahogany, or spiced sandalwood.
Maintenance and Care Tips
To keep your 3D plaid gel nails looking fresh, glossy, and pristine for 3 to 4 weeks, keep these care guidelines in mind:
- Protect Your 3D Charms: Avoid opening pop tabs or boxes using your nail tips. Always use the pads of your fingers to prevent prying off 3D metal bows or pearls.
- Wear Gloves: When washing dishes or handling harsh cleaning chemicals, wear protective rubber gloves to prevent dulling the gel top coat finish.
- Daily Cuticle Hydration: Apply cuticle oil twice daily to keep skin soft, prevent hangnails, and extend gel retention along the cuticle border.
- Avoid High Heat: Avoid prolonged exposure to boiling water or hot saunas within the first 24 hours of application to prevent heat-induced gel lifting.
Troubleshooting Common DIY Nail Art Mistakes
| Issue | Cause | Solution |
|---|---|---|
| Bows/Pearls falling off | Standard top coat used instead of gem glue | Use dense Builder Gel or Gem Glue Gel and cap all edges before final curing. |
| Plaid lines look blurry | Gel polish ran before curing | Cure each set of lines (black, white, glitter) individually for 10-15 seconds (flash cure). |
| Chocolate brown looks streaky | Applied too thick in one coat | Apply two ultra-thin coats, curing between each layer for full color saturation. |
| Pattern feels bumpy | Thick art paint layers | Use highly pigmented detail art gels that lay flat with minimal bulk. |
Final Thoughts
The Brown Plaid and Pearl Bow Manicure brings together the finest elements of seasonal nail art: warm tones, textured patterns, and jewelry-inspired 3D charm detailing. Perfect for autumn fashion, winter holidays, or everyday elegance, this design offers a sophisticated statement that elevates any look.