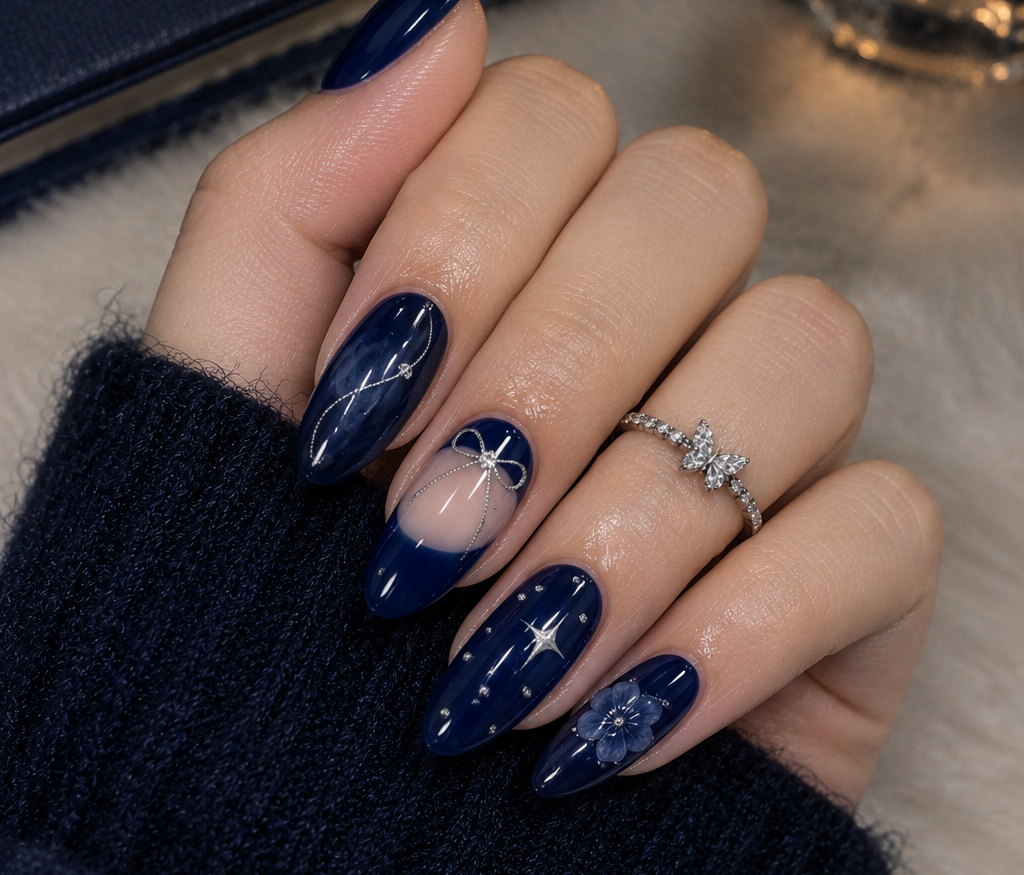
This comprehensive guide breaks down everything you need to recreate, customize, and maintain this stunning midnight blue manicure—from underlying color theory to detailed step-by-step DIY tutorials and expert longevity secrets.
The Aesthetic Appeal of Midnight Blue and Silver
The combination of deep navy or midnight blue with refined silver creates an immediate visual impact rooted in elegance and contrast.
Why Midnight Blue Works
- Universal Flattery: Deep blue tones contain a balanced mix of cool and warm undertones, making them flattering across fair, medium, olive, and deep skin tones.
- Modern Alternative to Black: Midnight blue offers the moody, dramatic allure of black polish while adding depth, richness, and luminosity under direct light.
- Seasonal Versatility: While popular in autumn and winter, midnight blue paired with celestial motifs or delicate bows translates effortlessly into year-round evening wear.
The Magic of Silver Detailing
- High Contrast: Bright silver linework, rhinestones, and metallic foil pop dynamically against a dark indigo background.
- Sophisticated Shimmer: Silver accents add light-reflecting dimensions without overwhelming the deep base color, preserving an refined look.
Breaking Down the Featured Manicure Design

The showcase manicure highlights an almond-shaped nail outline adorned with unique micro-artistry on every nail, balance, and harmony.
       [Index Finger]          [Middle Finger]          [Ring Finger]          [Pinky Finger]
  +-----------------------+ +-----------------------+ +----------------------+ +----------------------+
  | Full Midnight Blue    | | Negative Space Bow    | | Celestial Starlight  | | 3D Floral Petals     |
  | Fine Silver Swirls &  | | French Tip with       | | Metallic Silver Stars| | Encapsulated Center  |
  | Delicate Gemstones    | | Silver Line Art       | | Micro Silver Dots    | | Glossy Navy Base   |
  +-----------------------+ +-----------------------+ +----------------------+ +----------------------+
Detailed Design Breakdown
- Index Finger: Curved Celestial Swirls
- Base: Solid full-coverage midnight blue polish.
- Detailing: Ultra-fine metallic silver line art arching softly across the nail plate, dotted with tiny micro-rhinestones to mimic constellations.
- Middle Finger: Bow Accent & French Line Art
- Base: Sheer nude base with a classic curved midnight blue French tip.
- Detailing: A delicate silver bow painted at the smiling line, anchored by a central sparkling gem, blending soft negative space with crisp nail art.
- Ring Finger: Celestial Night Sky & Starlight
- Base: Deep indigo blue base layer.
- Detailing: A sharp 4-point silver starburst surrounded by scattered micro-dots, capturing the essence of a clear, starry night.
- Pinky Finger: Textured 3D Flower Accent
- Base: Deep blue glossy finish.
- Detailing: A dimensional, semi-translucent 3D flower petal accent with a silver bead center, adding physical texture to the visual artwork.
Essential Supplies and Tools Needed
To create professional-grade midnight blue nail art at home, gather the following tools and products:
| Category | Recommended Items | Purpose |
|---|---|---|
| Nail Prep | Dehydrator, Primer, 180/240 Grit Nail File, Cuticle Pusher | Clean and shape the nail plate to prevent lifting. |
| Base & Top Coats | Rubber Base Gel, No-Wipe High-Gloss Top Coat | Protect natural nails and seal art for 3+ weeks. |
| Polishes | Midnight Blue Gel Polish, Sheer Nude Base Gel | Primary shade and background for negative space. |
| Art Mediums | Metallic Silver Painting Gel, Chrome Powder, Gel 3D Sculpting Paste | High-pigment line art, stars, and dimensional flowers. |
| Tools & Accents | Fine Detail Liner Brush (7mm–11mm), Dotting Tool, Micro-Rhinestones, UV/LED Lamp | Precision painting, application, and curing. |
Step-by-Step DIY Tutorial: Recreating the Look
Follow this detailed step-by-step guide to execute this precise design at home or in the salon.
Step 1: Prep & Prime ──> Step 2: Base Coat ──> Step 3: Polish Application ──> Step 4: Nail Art ──> Step 5: Seal & Cure
Step 1: Nail Preparation and Shaping
- Gently push back cuticles using a sanitized cuticle pusher.
- File the nails into an Almond Shape by tapering the sides evenly toward a rounded central point.
- Lightly buff the shine off the natural nail surface using a fine-grit buffer.
- Cleanse the nail plate with isopropyl alcohol or dedicated nail cleanser to remove dust and oil.
- Apply nail dehydrator followed by an acid-free primer.
Step 2: Base Layer Application
- Apply a thin layer of rubber base gel to all nails, capping the free edge.
- Cure under a UV/LED lamp (60 seconds for LED / 120 seconds for UV).
Step 3: Base Color Application
- Thumb, Index, Ring, and Pinky Fingers: Apply two thin layers of dark midnight blue gel polish. Cure each coat for 60 seconds.
- Middle Finger (Negative Space): Apply a sheer nude gel polish layer and cure.
Step 4: Painting the Detailed Nail Art
- Index Finger (Swirls):
- Dip a fine 7mm liner brush into metallic silver painting gel.
- Paint two intersecting, sweeping curve lines from the sidewall to the tip.
- Place a tiny drop of top coat on the line intersection and secure a micro-rhinestone. Flash cure for 10 seconds.
- Middle Finger (Bow & French Tip):
- Paint a deep navy blue French tip curve using a strike brush. Cure for 60 seconds.
- Outline the smile line with a silver metallic gel line.
- Paint two loops and ribbon tails directly above the French line using your fine detail brush to form a bow.
- Place a small crystal in the center of the bow knot.
- Ring Finger (Celestial Starburst):
- Locate the center of the nail plate.
- Draw a thin vertical silver line, followed by a slightly shorter horizontal intersecting line.
- Add two shorter diagonal intersecting lines to form a 4-point twinkling star.
- Use a fine dotting tool to place tiny silver dots around the starburst. Flash cure.
- Pinky Finger (3D Floral Accent):
- Mix clear 3D builder gel or sculpting paste with a droplet of translucent blue polish.
- Shape 5 small petal beads onto the lower corner of the nail using an acrylic or silicone tool.
- Indent the center of each petal before curing.
- Add a tiny silver bead or rhinestone in the center of the blossom.
Step 5: Sealing and Finishing
- Apply a generous layer of No-Wipe Glossy Top Coat over all nails, making sure to float the brush over the 3D details to avoid trapping air bubbles.
- Carefully cap the free edges to ensure durability.
- Perform a final cure under the LED lamp for 60 to 90 seconds.
- Hydrate the cuticles by massaging a nourishing cuticle oil into the skin surrounding each nail.
Alternate Style Variations
You can easily adjust this manicure design to match different personal aesthetic tastes, length preferences, or skill levels.
1. Matte Midnight Blue with Metallic Chrome
- Style: Replace the high-gloss top coat on the midnight blue base with a velvety matte top coat.
- Effect: The contrast between matte dark blue and glossy or raised 3D chrome silver accents creates a striking modern look.
2. Short Square or Coffin Shape Adaptation
- Short Square: Focus design motifs (stars and bows) closer to the center of the nail bed to optimize visual spacing.
- Coffin/Ballerina: Leverage the extra surface area by adding longer flowing line art and additional starburst constellations.
3. Gold Accent Swap
- Swap all silver elements for 24K bright gold gel, gold chrome powder, and warm crystal studs for an opulent aesthetic.
Pro Tips for Long-Lasting Nail Art
To preserve your detailed manicure and prevent chipping, lifting, or dullness, keep these practical care strategies in mind:
- Protect Your Hands: Wear protective rubber gloves when washing dishes, cleaning with household chemicals, or working in the garden.
- Avoid Using Nails as Tools: Never use nail tips to scrape, pry, or open cans, as this stresses the gel structure and causes premature chipping.
- Daily Hydration: Apply high-quality cuticle oil twice daily to keep the natural nail bed flexible and prevent the gel overlay from separating.
- Cap the Free Edge: Always swipe your top coat brush horizontally along the front edge of the nail during application to seal all layers together.
Frequently Asked Questions (FAQs)
Q1: Can I recreate this nail art design using regular non-gel nail polish?
Yes, but precision details like line art and 3D textures are significantly easier with gel polish. Gel polish allows infinite painting time without drying until cured under a lamp. If using regular polish, allow base layers to dry completely before applying metallic linework with acrylic paint, and seal with a thick quick-dry top coat.
Q2: How do I create 3D flower petals if I don’t own sculpting gel?
You can create subtle 3D effects using thick builder gel, rhinestone glue gel, or 3D gel paste. Alternatively, flat-painted silver floral line art can offer a clean, two-dimensional alternative while maintaining the overall aesthetic.
Q3: What is the best nail shape for this dark blue design?
While this tutorial features an Almond Shape because it elongates the fingers and nicely frames French bow accents, midnight blue and silver nail art looks equally striking on oval, coffin, squoval, or short square shapes.
Q4: How long does a detailed gel manicure like this typically last?
When properly prepped, applied, and cured, a professional gel manicure incorporating rubber base coats and high-grade top coats lasts between 2 to 4 weeks without significant chipping or loss of shine.